


What App Builds Really Cost (2025-2026)
17 November, 2025
17 November, 2025
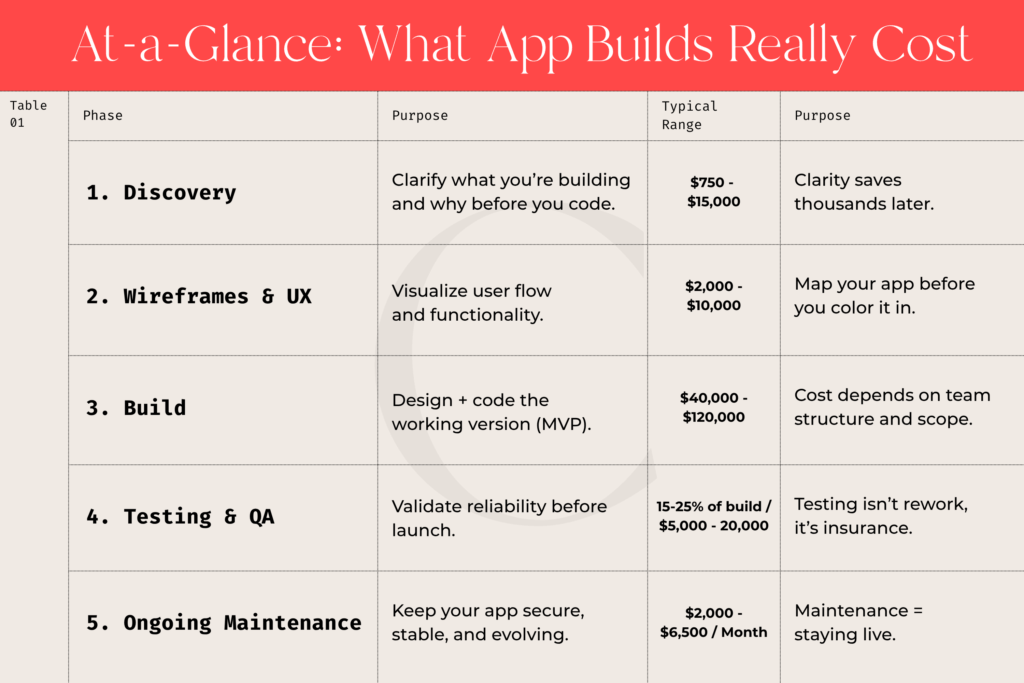
Bottom line: Expect roughly $50K–$150K total for a production-ready MVP plus $2K–$6K/month for continued health and evolution.
Cost is the biggest elephant in the room when it comes to building an app.
You might’ve seen everything from:
So, as an early-stage founder, the question becomes: What’s the real cost of building an application?
I wish there were a simple answer, but unfortunately, there isn’t. Because what you’re really asking is, “How do I get from idea to something that actually works, without going broke?”
In our experience, projects have ranged from $10,000 for a clickable prototype (a front-end mockup without backend functionality) to $250,000+ for a fully built MVP with complex integrations, user accounts, and a production-ready backend.
That’s a huge spread, and for good reason. Software isn’t a single purchase. It’s a series of scaffolded steps that build on each other.
If you look at the total number up front, it’s terrifying. It can feel impossible.
But if you treat each phase as its own milestone (Discovery, Wireframes, Prototype, Build, and Test), the process becomes manageable, strategic, and far less risky. We’re here to tell you that you don’t have to build everything at once, and anyone who tells you otherwise should be a red flag.
You can think of each step as a mini project that earns you progress and proof before committing to the next.
That’s how smart founders, the ones who make it past version one, approach development.
The goal of this post is to walk you through what that process looks like, what each phase typically costs, and how to financially plan your build in a way that keeps momentum (and sanity) intact.
Repeat after me: Clarity will save you money in the long run.
Yet it’s the phase most founders skip, not out of carelessness, but excitement. You finally have an idea you believe in, and you just want to start building. That’s where things can get very expensive, very quickly.
Discovery is where you slow down just enough to speed up later.
It’s where you learn:
Think of it as a low-cost sandbox for your imagination. You get to put every feature idea on the table without racking up design or development bills. Then, you pare back to the essentials that belong in your first release. Because once your app hits the market, users will tell you, unapologetically, what they like and what they don’t.
It’s far better to test a simple, functional product than to overspend on bells and whistles the market doesn’t care about. We know for a fact that clarity isn’t a delay; it’s insurance against wasted code.”
At Coura, we approach discovery in two ways:
From there, we map out:
Here’s an example of a user story:
“As a registered user, I want to reset my password through email so I can regain access without contacting support.”
It’s simple, but powerful. That one story tells everyone involved, designers, developers, QA, and you, what must happen on the front end (the screen), in the app logic (the code), and on the back end (your admin tools, analytics, and data handling).
Discovery gives you a blueprint, not just an idea. Once your screens and user stories are documented, you can finally get an accurate estimate from your development and design partners, no guesswork, no “it depends.” You’ll know exactly how many hours and what costs to expect for design, development, and testing.
Because trust me: you won’t build your app just once. You’ll build it, launch it, learn from the market, and build again. Discovery simply ensures each of those versions gets you closer to something that actually works without burning through your budget on the way.
Once you’ve gotten your ideas out of your head and onto paper, the next phase is to visualize them.
This is where abstract ideas start to feel real — where strategy becomes something you can actually see.
There are three main ways to visualize an app before it’s built:
These are your blueprints: simple, black-and-white layouts of your app screens that focus purely on structure and flow, not color or polish. In the industry, we call them lo-fi wireframes. Check out an example below:
The goal here is to understand:
Think of this like storyboarding your product. Before Pixar animates a single frame, they sketch the story scene by scene. Lo-fi wireframes work the same way in that they let you test how your story unfolds for your users.
Many designers will even start with a simple flow diagram (a visual map of screens and decision points) before moving into screen sketches. It’s a low-risk way to spot missing logic or unnecessary complexity early. Because, in your head, it’s three screens, but in wireframes, it’s twenty-four, because now you’re seeing the details that make it work.
For example, take a standard login page. You might think it’s one screen, but in reality, it often includes:
That’s already four or five separate flows, and each one must be designed, tested, and built. Wireframes help you uncover those hidden layers before they cost you development dollars.
Typical range (industry average):
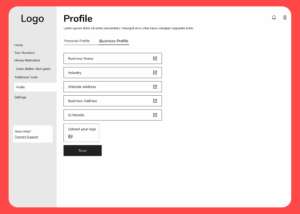
Once the core flow is solid, you move into hi-fi wireframes aka layouts that reflect your brand, typography, and color palette. These look and feel close to the real product.
This is where aesthetics meet usability. Hi-fi designs often serve as the foundation for your development handoff, showing exactly how the app should look and behave.
Typical range: $3,000–$8,000, depending on the number of unique screens, custom components, and feedback rounds.
The final visualization stage is a clickable prototype — an interactive mockup (usually in Figma or similar) where investors, testers, and future users can click through your app as if it were live.
Clickable prototypes are especially powerful for:
Typical range: $4,000–$10,000, depending on interactivity and number of flows.
At Coura, we include black-and-white wireframes in most of our discovery sessions because they help founders see their idea come to life. For many early-stage clients, that’s the moment the fog lifts and their product becomes tangible, understandable, and financial scoping becomes possible.
Different teams structure this phase differently. Some contractors skip wireframes entirely and jump straight into design, which can work for tiny projects. But for anyone building an MVP or scalable product, skipping this stage means flying blind.
In short: wireframes give you vision before you commit to velocity. They reveal missing screens, clarify user journeys, and surface decisions that save you thousands later in the build.
Sorry, but this is where the sticker shock sets in.
After discovery and wireframes, you finally get a development estimate, and suddenly it’s way higher than you expected. Maybe $60,000. Maybe $150,000. And your first thought is:
“How can writing some code cost that much?”
Let’s unpack that—because the cost to build your app depends on who’s doing the work, how it’s managed, and how much time you can personally invest as a founder.
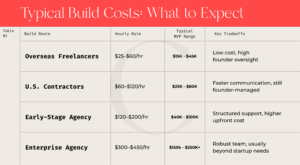
Working with individual freelancers, designers, developers, or QA testers can look appealing on paper. You’ll see typical rates like:
This route can absolutely work, and many successful founders start this way. But here’s the tradeoff: you become the project manager.
You’ll need to:
If you have strong technical literacy, time to manage details, and a simple MVP, this can save money. If you don’t, the savings can quickly disappear into scope confusion, missed deadlines, and redo costs. Freelancers save you dollars, but agencies save you bandwidth. Which one you need depends on what you have less of.
Agencies charge more because they bring a whole system of designers, developers, QA, project managers, and technical leads who handle the complexity for you.
They manage quality control, ensure consistency across environments, and (if they’re good) teach you what to expect along the way.
Typical hourly rates vary widely:
As an early-stage founder, you don’t need the top of that range. You need a partner who specializes in MVPs, understands resource constraints, delivers fast feedback loops, and embraces the messy first versions of an idea.
However, even with agencies, not everything is “included.”
At Coura, for example, we structure projects so that clients cover direct costs like:
That transparency ensures founders know exactly where their dollars go: toward the app itself, not hidden expenses.
Here’s a rough, realistic range for MVP-level builds (assuming you’ve completed discovery and wireframes):
Most Coura clients fall between $40,000 and $120,000 for their first working MVP, depending on complexity (for example, a social feed, chat, or payment integration adds cost).
Ultimately, this comes down to your team size, technical fluency, and available time.
There’s no single “right” way, but there are clear red flags to watch for.
If a quote feels too low (for example, someone offering to build your entire cross-platform app for under $10K), that’s usually a sign that:
If your quotes come back so high that they feel out of reach, that doesn’t mean your idea is impossible. It just means your scope is oversized for this phase.
That’s the moment to return to your discovery work:
The build phase is where your dream meets reality, and where the investment starts to look serious. But it’s also where the right strategy can save you from painful surprises later.
Whether you go with contractors or an agency, treat the build not as a one-time event, but as the first iteration of many.
Because what you’re building here isn’t just an app, it’s the foundation of a business that will keep evolving as your users teach you what really matters.
This is the part most founders wish they could skip, until they realize what it protects them from.
When you finally see your app come to life, testing can feel like an annoying slowdown. You might think, “Didn’t I already pay for this to work? Why am I paying for testing too?” The truth is: testing isn’t fixing mistakes, it’s proving reliability.
Think of testing like a home inspection before you move in.
You’ve paid the builders to construct the house, but you still need to check the plumbing, wiring, and doors before you sign off and hand over the keys. If a pipe leaks during inspection, it doesn’t mean the builders did a bad job, it means you’ve caught a weak spot before it floods the basement.
Software works the same way. When code is written, thousands of small variables are introduced — devices, screen sizes, network speed, login states, browser versions. Testing exists to make sure every one of those moving parts works together, under real-world conditions.
A proper QA (Quality Assurance) process usually covers:
This is why QA takes time; every update or fix can ripple across multiple areas of the app.
At Coura, testing and QA are always a separate line item and are included in the overall build costs. That’s intentional.
It allows our founders to:
Testing begins only once a functional version of your app is ready. We have 4 rounds of QA at our team, first the development team tests, then the design team, project managers, and finally team members who are not a part of the app build, ensuring fresh eyes on every screen and feature.
They follow a detailed testing checklist (aka acceptance criteria) mapped to your user stories, confirming that each piece of functionality behaves exactly as intended.
This process typically accounts for 15–25% of the total build effort, depending on the scope and number of features.
Typical Coura QA range: $5,000–$20,000 for MVP-level projects (Typically included in the build estimates as a line item)
Every team does this differently:
The key isn’t which model you choose; it’s that testing happens intentionally, with time budgeted for it.
Skipping or underfunding testing is one of the most expensive mistakes a founder can make.
A bug that costs $200 to fix in development can easily cost $2,000 after launch (not to mention the lost user trust).
You can’t build a car and skip the crash test. You can’t build an app and skip QA.
Even the most experienced developers introduce small errors with every new feature. That’s normal, and what matters is catching them before your users do.
For a typical MVP, expect testing and iteration to represent 15–25% of your total build time, whether it’s billed separately or embedded in your development hours.
At Coura, we view testing as the invisible layer of trust between you and your users. It’s what turns a working prototype into something ready for the world.
When your app launches, it can feel like the finish line. But in reality, it’s the beginning of a new chapter: maintenance, updates, and continuous support.
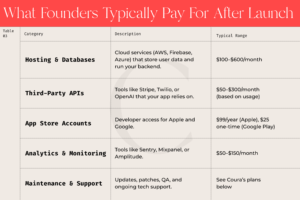
Every digital product, no matter how well built, needs upkeep. Servers need updates, SDKs change, APIs expire, and iOS or Android release new versions that can break old code overnight. Building your app gets you to market but maintaining it keeps you there.
Even after launch, your app lives inside an ecosystem that’s constantly moving. Cloud servers, databases, and external tools all evolve, and if your app doesn’t keep up, small issues turn into outages fast.
That’s why every founder should plan for continuous support, just like you’d plan insurance or accounting. It’s not optional overhead; it’s how you protect your investment.
At Coura, we treat post-launch support as Continuous Development, a subscription-based partnership that keeps your app stable, secure, and evolving.
Our goal is to eliminate the stress of hourly surprises and provide founders with predictable, transparent care.
Each monthly plan reserves a dedicated developer and project management capacity exclusively for your product, guaranteeing your hours are not shared with other clients.
Coura Plans at a Glance:
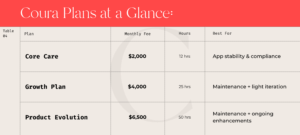
All plans include:
Enhancements or new feature requests are quoted separately before work begins, so you’re never surprised by costs.
Every Coura project includes a 30-day warranty period after final delivery.
This is a best-practice window in the software industry, most agencies offer 30–90 days, because during that time, your app is being used under real conditions, revealing any missed edge cases or environment-specific bugs.
After 30 days, ongoing maintenance takes over.
Why not longer? Because software doesn’t break in isolation. It changes as operating systems, APIs, and browsers update. Past that initial window, new issues usually stem from external updates rather than the original build.
That’s when continuous maintenance, not warranty coverage, becomes the right tool for the job. Think of it this way: a warranty ensures a smooth handoff. Maintenance ensures you stay live when the world around your app shifts.
A stable MVP typically costs $300–$1,000/month in hosting and third-party services, and $2,000–$6,500/month in ongoing technical care depending on plan and complexity.
It’s a predictable cost that pays off in uptime, performance, and peace of mind, especially when you’re growing a user base or pitching investors.
Skipping maintenance might save you money for a few months, but it usually costs more later when things break at the worst possible time (often right before a launch, funding round, or investor demo).
Building an app isn’t a one-time event; it’s a series of intentional investments. When you break it down stage by stage, you buy clarity, quality, and confidence.
If you’re ready to see what your idea would really cost to bring to life, start with Coura’s Mini-Discovery Session ($765): a focused, low-risk way to gain clarity before you invest.
You can learn more here, or you can go ahead and book time with us now.
After all, clarity is the best ROI you’ll ever buy.
This content is provided for informational purposes only and does not constitute a binding offer, quote, or financial guarantee. All price ranges reflect Coura’s standard practices and general market averages as of 2025. Actual costs depend on project size, integrations, and selected plan.Formal service terms, warranty scope, and support levels are governed by your signed Coura Service Agreement.